Looking for IT Support In Wichita? Call Us Now! (316) 788-1372

We’re excited to roll out our new AI powered email security tool, Inky!
To get us started, here are some highlights and things you should pay attention to.
First, many emails will have a banner at the top of them like those shown below. Inky learns who you regularly correspond with and will adjust how it labels those messages.
![]()
A GRAY banner like this indicates the email is from an External Sender, you’ll see it on the first email or two that you get from a new external server. You’ll also see it on messages from people you know as Inky learns about them, but then it will disappear.

A YELLOW banner tells you that the email is POSSIBLY a phishing or spam message. Inky will put KNOWN phishing and junk emails in your Junk Folder in Outlook, but messages that it’s not sure about will get this banner. You can clean up your Inbox and help Inky learn by clicking the link to report the message as Phishing, Spam, or Safe.

A RED banner means this is probably a DANGEROUS email. Unless you are 100% sure it’s legitimate, DON’T CLICK LINKS OR OPEN ATTACHMENTS on these emails. Report them as phishing or spam if you’d like, but Inky is pretty sure about these.
You may also see a banner applied if Inky feels there is SENSITIVE CONTENT in the email, like banking information or personal information like credit card or Social Security numbers.
If you have any questions about these banners, reach out to our support team.
Every Inky banner also has a “More” link on it, that will lead you to a more detailed page where you can submit an email as phishing or spam.
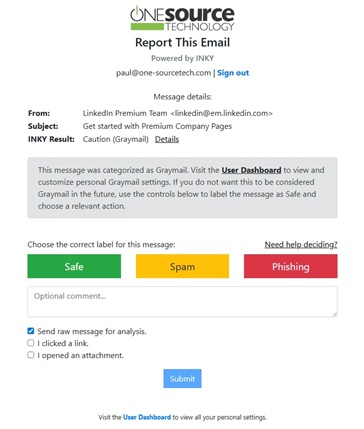
You can also let US know if you clicked a link or opened an attachment on that email from this page. And at the bottom will always be a link to the Inky User Dashboard, where you can manage your preferences.
Now, on to some of my favorite features. With Inky you can manage your ALLOW and BLOCK lists. Simply visit this page – Inky User Dashboard and click USER CENTER at the top right to add or remove senders from your filter list. You’ll just log in with your email address and your Office 365 password. Once you’re there, you’ll see a page like this one –
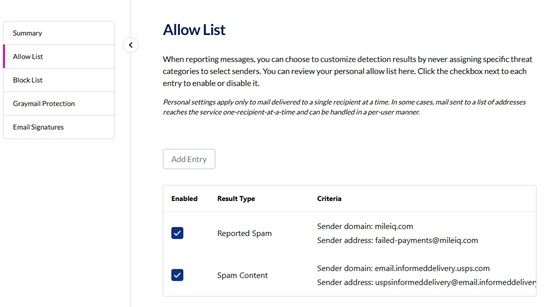
Just click the Add Entry button to add as sender to your Allow List. The Block List is in the column on the left side and works the same way.
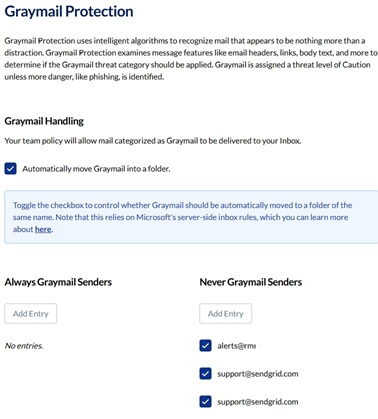
Without a doubt, Inky’s Graymail feature has changed my Inbox. If you think about the emails you get every day, a bunch of them aren’t really spam (Eddie Bauer, Best Buy, assorted vendors and organizations), so you don’t want to block them. But they do take a lot of time to sort thru and get in the way of the emails you really want to read. Once you turn Graymail filtering on, Inky will CREATE A NEW FOLDER IN YOUR OUTLOOK called Graymail and will move these messages to it. Your Graymail folder will be on the side of Outlook, just like your Inbox, Deleted, and Junk folder. Here’s where you turn in on –
I’ve started to check that folder once a day, it saves me a bunch of time.
Our team hopes you find this to be as big of an improvement as we have. As always, if you have questions, reach out to your Technical Consultant or our support team.
![]()
Fill in your information below and we will email you our complete guide to business IT security.